

How to Build a Compost Bin: Step-by-Step Guide with Photos

Making your own compost is a fantastic way to reduce waste, and create free natural fertilizer for your garden! If you’re interested in setting up a new compost pile, you’ve come to the right place. This tutorial will walk you through the step-by-step process we took to build a compost bin – including the supplies needed, our DIY compost bin design and plans, and tons of photos to guide you along the way. There is a condensed printable version at the end of this post too!
We’ve been composting for over a decade using a variety of smaller systems. Yet the recent addition of four mini-donkeys to our homestead motivated us to finally build the big 3-bay compost bin of our dreams. They generate a lot of manure, which will make stellar compost!
Once we came up with the design, it was quite simple to build the compost bin… so we’ve already done the hardest part for you! It reminded me a lot of building a raised garden bed since we used many similar materials and steps. Even if you don’t follow our exact design, I hope you find this helpful as a general guide and inspiration!

Disclosure: Homestead and Chill is reader-supported. When you purchase through links on our site, we may earn an affiliate commission.
The Best Compost Bin Size
Compost bins come in many shapes, sizes, and styles. On our homestead, we use everything from a compact worm bin and compost tumblers to large 3-bay compost bins.
To make a traditional passive or slow compost pile, it’s best to provide at least a three-by-three foot space. Yet for optimal microbial activity and decomposition, a compost pile should be at least 4x4x4 feet. That allows for enough material to be piled up to make a hot compost pile too, which is what we plan to do!
If space allows, it’s ideal to provide an area for several piles (usually separated by walls or “bays”) so that the compost can be rotated and turned. A classic 3-bay compost system includes one section to actively add fresh material to, one section that’s regularly being turned but not added to, and a final section to hold finished compost – ready and waiting to use in your garden.
In today’s lesson we’ll build a compost bin with 3 bays, though you can tweak this tutorial to make just a single bay, two-bay, or smaller 3-bay compost bin as well. We used to have just a single bin at our old urban homestead – and it did the job!


Our New Compost Bin Plans and Design
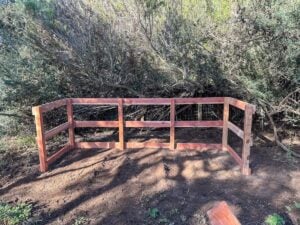
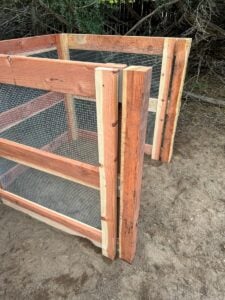
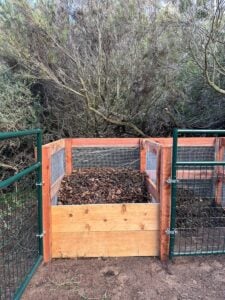
Below are photos and drawings of our 3-bay compost design. The compost bin features three 4x4x4 bays, and takes up a total footprint of about 12×4 feet. I’ve also included a bonus drawing of a second simplified compost bin design that you could use if you prefer (yet note the lumber dimensions and instructions will vary slightly).
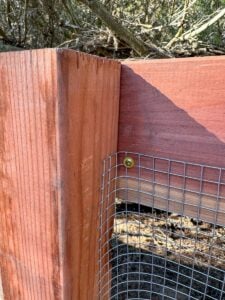
Our compost bin design features removable face boards that can be added via tracks or slots along the frontside of each bay. By doing so, you can pile up the compost nice and high rather than letting it spill out the otherwise open front side. This helps maximize the use and capacity of the compost bin, and is also optimal for speedy decomposition and hot composting!


Donkeys, Gates, and Design Flexibility
Please note that we designed our DIY compost bin with a few very specific needs in mind. In addition to being durable, functional, and attractive, we needed our compost to be donkey-proof!
Our four 250-pound miniature donkeys LOVE to rub up against wood posts and structures, yet we needed to build the compost bin in their pasture area for easy manure management. So, we chose extra sturdy lumber and also added additional support braces to withstand their rubbing.
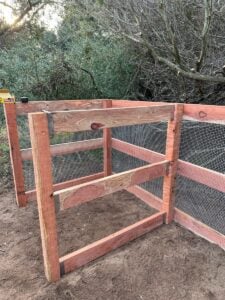
In addition to the removable front wood slats, we also added hinged gates to the front side of each compost bay to keep the donkeys out (which we can also take completely off and on with ease). As a bonus, the gates will deter some other critter activity as well!
That said, we had to ensure the width of each compost bay (or space between the walls) was very precise, since the gates needed to fit on the front side of each. The walls also had to be very straight so the gates could hang square and level. Though they’re fairly light, the gates do put added weight and pressure on the compost bin walls, so I only recommend adding them if necessary.
Since most of you folks won’t have such specific quirks to work around, feel free to be more flexible and creative in your compost bin design and build! For example, it’s not a big deal if your bays aren’t all exactly the same size or perfectly level.


Supplies Needed to Build a Compost Bin
Here are the tools and supplies we used to build a compost bin, along with some alternative materials you could use too. See the printable “how-to” at the end of this post for a condensed supplies list and instructions.
Tools
- Saw
- Power Drill
- Level
- Aviation snips, for cutting hardware cloth
- Measuring tape
Hardware
- Longer screws: 2 ½ to 3-inch outdoor wood screws or decking screws to connect the 2x6s (or 2x4s) to the 4×4 corners.
- Shorter screws: 1-inch or 1-1/4″ wide head cabinet screws to attach the hardware cloth to the 2×6 walls
- Fence rail brackets (12 total) to connect the 2x6s to the 2x4s on the two interior walls of the compost bin
- Screws to attach brackets: 1 inch or 1/4″ inch screws – either use the same cabinet screws as above or shorter wood/deck screws
- Optional: 4 flat corner braces (one for each wall) for added stability.
- Optional: 4-foot steel tube gates, one for the front of each bay. (The gates come with J-bolt hinges to hang them, but you’ll need a 1/2″ drill bit to make pilot holes for the J-bolts.)
Lumber
- We used redwood 2×6 lumber to build our compost bin, as we wanted something extra durable and sturdy that will stand the test of time (and donkeys). You could also use 2×4 boards, though you’d want to add an additional horizontal row of boards (four rows instead of three like we did) so take that into account when you’re calculating lumber needs. Redwood is easily accessible here in California, though cedar is another great durable alternative.
- We chose 8 foot long boards to build our compost bin because a) that’s what fit in our Subaru, and b) it divides up nicely without waste (compared to using 10 ft boards for 4-foot walls for example).
- In total, we needed eleven 8-foot 2x6s for this compost bin design. However, 12 foot boards would work even better for the backside! That way, you could use three solid 12-foot long boards along the back, plus six 8-foot boards for the walls instead.
- Four 8-foot 4×4 boards (cut in half) for the corner supports or end of each wall
- Three 8-foot 2x4s (cut in half) to create the slots that the removable face boards will slide into along the front side of each bin.
- Removable face boards: 1×12 inch pine wood boards (which really measure ¾” inch thick). Using three per bay, they stack up to create a nice 3-foot tall front wall. We used five 8-foot long boards total, cut roughly in half. Or, use 9 of these four-foot boards and trim them if needed. Wait to measure and cut the boards for each bay until after you build the compost bin!

Wire Mesh
Compost needs to breathe! To provide adequate airflow, we built our compost bin with minimal wood and lined the walls with hardware cloth instead. You’ll need about 25 to 30 feet of 4-foot wide 1/2″ hardware cloth for our size bin.
Hardware cloth is ideal for a compost bin design for several reasons: a) it stays taught and won’t bend or bow out under the weight of the compost b) the gaps are small enough to hold little bits of compost IN while also keeping vermin OUT, and c) it’s galvanized and won’t rust, so it’ll last forever!
You could also use chicken wire to build a compost bin, though if you do, I would add more wood slats around the outside to offer additional support. Also keep in mind chicken wire is prone to degrading over time, and vermin can fit through the holes.

INSTRUCTIONS
Step 1: Choose a Location + Site Prep
Where to put a compost bin? A compost pile should be located close enough to your garden or house for easy access and use, but not so close to home that potential odors or flies would be an issue. (Though a properly maintained compost pile should not stink!)
The compost bin should also be located on fairly level ground. Since it’s quite large and heavy, we built our compost bin in place and used a landscaping rake to smooth out the ground surface first. You could also construct the smaller side walls on a flat work surface elsewhere, then assemble the compost bin in its final location.
Finally, it’s best to leave the bottom of the compost bin open to the native soil below (as opposed to adding landscape fabric, wire, or other materials below it). This leaves opportunity for drainage, beneficial microbe exchange, natural earthworm activity, and also makes it easier to turn or scoop out the compost without getting snagged up on something on the bottom.
FAQ: Should a compost pile be in the sun or shade?
A compost pile can be located in either sun or shade, and there are pros and cons to each. A sunny location will help to warm the compost, speeding up decomposition nicely. Yet a lot of sun will also dry out the pile more readily, requiring it to be watered more often as needed. In the shade, the compost will stay nice and moist but will break down slower.

Step 2: Measure and Cut Wood
Next, gather all your lumber, take and mark measurements, and cut the boards to the desired size for your DIY compost bin design.
- Corners: Cut the 4×4 corners to four feet tall (e.g. cut the 8-foot 4x4s in half)
- Back: If you’re using 12 foot boards, the back wall boards won’t need to be cut at all. Since we used 8 foot boards, we left three of them whole at 8 feet, then cut a couple to create the three additional 4-foot boards needed for the back of bay 3.
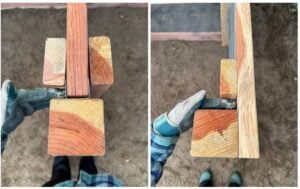
- Walls: Though each bay is about 4×4 feet, we didn’t cut all of the side wall boards exactly to four feet. Because the two interior walls also have the added length of a 4×4 on each end, we cut six eight-foot boards at 51.5 inches that were used for the two end walls (the total depth of the finished compost bin). That left behind 6 pieces that were 44.5 inches to use for the two interior walls – which also equals 51.5 inches once the 4x4s are added to each end (since 4x4s actually measure 3.5 by 3.5 inches). See photo below.


Step 3: Build Compost Bin Outer Walls
- Begin by building one end or outer wall of the compost bin. For our compost bin design, these were the 51.5” sections.
- We find it is easiest to lay two 4×4 corner pieces on a flat surface (spaced the width of the wall), then lay the three horizontal 2×6 boards across the 4x4s – one at the top, one at the bottom, and one spaced halfway in between. Keep the ends of the 2×6 flush with the sides of the 4×4. See photos below.
- Next, add 2 long screws to the ends of each 2×6, securing them to the 4×4 below.
- Repeat the same process for the second outer wall.
TIP: Before securing with screws, check that everything is square using a carpenter square or measuring tape. With a tape, I measure the distance between the 4x4s at both the top and bottom to ensure they’re equal. I also like to help hold everything tight in place while Aaron screws everything in.


Step 4: Install Back
- Once you have the two end walls of the compost bin assembled, stand them up and add the long boards along the back to create a giant U-shape. Try to set everything up where you want it to stay long term, as the compost bin will get heavier and more difficult to move the more you add to it.
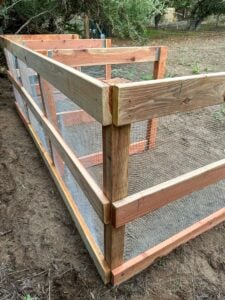
- It’s important to keep the 2x6s on the outside of the bin, with the 4×4 corners facing the inside of the bin. (The 4x4s provide part of the lip or edge that the removable front boards will tuck into.) Also check that the walls and back boards are relatively level as you go – front to back, and side to side.
- Again, this part is extra easy using 12 foot boards. Simply add the 12 foot boards between each end wall, securing them to the corner 4x4s.
- Since we built our compost bin with 8 foot boards instead, we had to construct the backside in sections by connecting 8 foot boards and 4 foot boards together in the middle with an additional 4×4 to create the total 12 feet. (That additional 4×4 will become the base for one center wall)


Step 5: Add Inner Walls
Next the compost bin needs two interior walls, spaced 4 feet apart. Ours are 43.5″ apart when measuring inside-to-inside of each 4×4, as shown in our design drawing.
If you’d like, you can go ahead to Step 6 and add hardware cloth to the back and side walls first (as you’ll see we did in the photos below), as long as the hardware cloth won’t impede where you’re attaching the two inner walls.
To build the compost bin inner walls, you can either assemble them separately (like the outer walls) and then attach them to the back wall of the bin, or build them onto the back boards in-place. We chose to build them in-place since one of the inner wall 4x4s was already connected to the back.
- In our DIY compost bin design, the inner walls are made with three 44.5 inch boards connected between a 4×4 on each end.
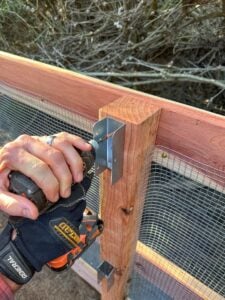
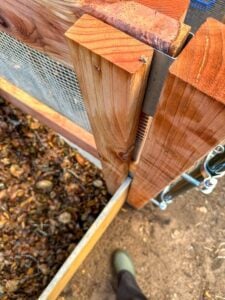
- We used these fence rail brackets to connect the 2x6s to the 4×4, with one at the top of the 4×4, one at the bottom, and one spaced halfway in between. Screw them onto the 4×4 first, ensuring the brackets are centered, straight and level on the 4×4. Then slide the 2x6s into the brackets and add screws to secure them.
Reminder: keeping the 4x4s at the end of the 2x6s (rather than screwing the 2×6 flat against the 4×4 side) creates a lip and part of the slot we need for the removable front boards.


Step 6: Add Hardware Cloth
- After building the compost bin frame, it’s time to add mesh wire (hardware cloth) along the inside of the walls and back.
- Be careful when working with hardware cloth – it can easily scratch and poke you!
- Rather than wrapping an entire bay in hardware cloth at once, we found it was easiest to measure, cut, and attach the hardware cloth to each wall one-by-one.
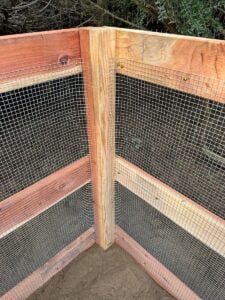
- It’s fine to overlap the hardware cloth onto the 4x4s along the back wall and corners, but keep it flush with the 4×4 on the front side so extra hardware cloth won’t block the slot where the removable front boards will go. See photos below.
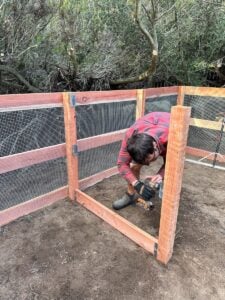
- Secure the hardware cloth to the wood using 1” cabinet screws, pinching a corner section of the wire mesh under the wide head of the screw. Add screws in several places.
TIP: Since hardware cloth tends to bubble, I found it was easiest to hold the cut piece of hardware cloth in place, straight and centered on the wall where we wanted it. Then we secured it with screws along the middle first (one in each wall board) and slowly worked our way out, adding screws from the center towards both corners of the walls, holding or pulling the hardware cloth taught and smooth as we went.


Step 7: Removable Face Boards
Now it’s time to create the slots or “tracks” for the removable front boards to slide into.
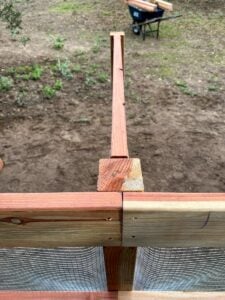
- Add a 2×4 vertically to the inner wall of each bay – 2 per bay, or 6 total. See photos below.
- Use screws to secure each 2×4 vertically about 1 inch to 1.25 inches back from 4×4 at the front of each wall. We used “1-inch” thick face boards, but their true measurement is ¾ thick. The ¼ to ½ inch gap gives us enough wiggle room to easily get the boards in and out (leaving room for any swelling), but without so much extra space that the boards can fall in front or behind one another.
- Measure to ensure the spacing is fairly straight and even along the entire length between the 2×4 and 4×4 before securing them, so the removable face boards can move smoothly up and down the track.
- Wait to cut the removable face boards until the compost bin and tracks are completely assembled! Measure and note the length of the front slot for each bay. We found that the width of our bays varied slightly, requiring us to cut custom boards of different lengths to fit each bay (3 per bay). I added a number 1, 2, or 3 to the back of each board to easily keep track.
TIP: When measuring and cutting the face boards, give yourself a little bit of wiggle room. Cut them long enough so they’ll stay tucked into the desired track, but not so long that they’ll be tight and difficult to get in and out.


Step 8: Finishing Touches
At this point, your new DIY compost bin is basically complete and ready to use! However, we chose to add a few finishing touches to ours.
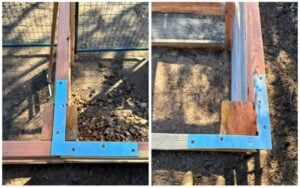
- To give the walls added stability (for the donkeys), we added an 8” flat corner brace to the top of each wall – or four total.
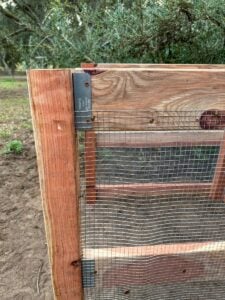
- We also installed lightweight 4-foot Behlen Country steel tube gates on the front of each bay.
They’re secured closed to the 4x4s with a simple eye hook and carabiner type latch. If you’ve never hung gates on J-bolts before, I highly recommend watching this tutorial. However, we installed the J-bolts straight out of the front of the 4×4, not on the sides. We also kept both J-bolts facing UP intentionally, so we could easily lift and take the gates off if needed – such as when we’re turning the piles from one bay to the next. - For added vermin and pest protection (if needed), you could also build and attach a hinged lid on top of each bay, such as with wood and hardware cloth.
- I also chose to stain the pine front boards (outward facing side only) to help the light wood blend in better with the overall design.


And that’s how it’s done.
That, my friends, is how we built our new compost bin. I know that was probably a lot to take in, but I sure hope the added details and photos made it easier to understand! Please let us know if you have any questions in the comments and we’d be happy to help.
Next, you may be wondering… how do I actually USE this thing? I promise I will follow up soon with a guide on how to use a 3-bay compost bin, along with how to make a hot compost pile. In the meantime, don’t miss the related articles listed below. Also please consider sharing or pinning this post if you found it useful, and leave a review! Thank you so much for reading. Happy composting!
You may also like:
- Composting 101: What, Why & How to Compost at Home (this guide covers compost basics, including what type of food waste, browns, greens, and other materials to add!)
- Vermicomposting 101: How to Make & Maintain a Simple Worm Bin
- How to Make Actively Aerated Compost Tea to Fertilize Your Garden
- How to Amend and Fertilize Garden Bed Soil Between Seasons
- How to Build a Raised Garden Bed: Step-by-Step Guide
- Companion Planting 101 (w/ Garden Companion Planting Chart)

How to Build a Compost Bin (Wood 3-Bay Compost Bin Design)
Equipment
- 1 Power Drill
- 1 Saw (electric)
- 1 Measuring Tape
- 1 Level
- 1 Aviation snips to cut hardware cloth
Materials
Lumber
- 11 pieces 8-foot 2×6 boards (or three 12-foot boards + six 8-foot boards)
- 4 pieces 8-foot 4x4s
- 3 pieces 8-foot 2x4s
- 5 pieces 8-foot 1×12 boards (or nine 4-foot long 1x12s)
Hardware
- 2 ½ to 3-inch outdoor wood screws or decking screws
- 1-inch or 1-1/4" wide head cabinet screws
- 12 Fence rail brackets
Other
- 30 feet 4-foot tall 1/2" hardware cloth
- Optional: 4 flat corner braces (one for each wall) for added stability
- Optional: 4-foot steel tube gates, one for the front of each bay
Instructions
Step 1: Select and Prep Site
- Choose a location that is fairly level, preferably near the garden (if you have one).
- Sun or shade is fine. Sun = speeds up decomposition but will dry out more. Shade = will stay more moist but break down slower.
- Leave the bottom of the compost pile open to the native soil below. Remove any debris and level the ground some if needed.
Step 2: Measure and Cut Wood
- Corners: Cut the four 8-foot 4x4s in half, to create eight 4-foot long corner pieces.

- Walls: Cut six 8-foot 2×6" boards at 51.5 inches, which will create six 51.5" boards fo for the exterior walls, and leave size 44.5" boards for the interior walls (since 51..5+44/5 = 96 inches or eight feet).
- Back: Leave three 8-foot 2x6s for the back, and cut two 2×6 boards at 48" to get the additional three 4-foot boards you'll need to finish the 12-foot long back. OR, simply use three solid 12-foot long 2×6 boards.
- Front wall slats: Cut three 8-foot 2x4s in half to create the "tracks" for the face boards, but WAIT to measure and cut the 1×12" removable face boards until after the compost bin is fully assembled.

Step 3: Assemble Exterior Walls
- Lay two four-foot 4x4s parallel on a flat work surface, then place three 51.5" 2x6s on top in the opposite direction: one across the top, one at the bottom, and one halfway in the middle.

- Keeping everything square and the ends of the 2×6 boards flush with the side of the 4x4s, add two long decking screws to each of each 2×6 to secure in place.
- Repeat for the second exterior wall.


Step 4: Add Back to Exterior Walls
- Stand the end walls up in place where the compost bin will go, with the 2x6s on the outside and 4x4s facing inward.

- Connect the two exterior walls using either three horizontal 12-foot 2x6s, or a combination of three 8-foot boards plus three 4-foot boards, connected with a 4×4 in the center.
- Keep the back boards flush with the 4×4 corners. Try to keep everything square and level as you go.

Step 5: Build and Add Interior Walls
- Add two interior walls, spaced approximately 4 feet apart in the center of the bin.
- You can assemble them separately (like we did the exterior walls) then connect them to the backside of the frame, OR built then in-place onto the back walls
- Using fence rail brackets, connect three 44.5" 2x6s sandwiched between two 4x4s (end to end) – one at the top of the 4×4, one at the bottom, and one spaced halfway in between.
- Screw the brackets onto the 4×4 first – centered, straight and level on the 4×4. Then slide the 2x6s into the brackets and add screws to secure them.
- Optional: skip ahead to Step 6 and add hardware cloth to the back and exterior walls first then continue with adding interior walls – as long as the hardware cloth won't impede the points of connection.

Step 6: Add Hardware Cloth
- After building the compost bin frame, add mesh wire (hardware cloth) along the inside of the walls and back.
- Rather than wrapping an entire bay in hardware cloth at once, we found it was easiest to measure, cut, and attach the hardware cloth to each wall one-by-one.
- It's fine to overlap the hardware cloth onto the 4x4s along the back wall and corners, but keep it flush with the 4×4 on the front side so extra hardware cloth won’t block the slot where the removable front boards will go. See photos.
- Secure the hardware cloth to the wood using 1” cabinet screws, pinching a corner section of the wire mesh under the wide head of the screw. Add screws in several places
Step 7: Removable Face Boards
- First create the slots or “tracks” for the removable front boards to slide into. Do so by adding a vertical 4-foot 2×4 to the front inner walls of each bay (six total, 2 per bay).
- Use screws to secure each 2×4 vertically about 1 inch to 1.25 inches back from 4×4 at the front of each wall – enough space to easily slide the 1" face boards (real measurement 3/4") up and down in the track.

- Wait to cut the removable face boards until the compost bin and tracks are completely assembled! Measure and note the length of the front slot for each bay. We found that the width of our bays varied slightly, requiring us to cut custom boards of different lengths to fit each bay (3 per bay).

- When measuring and cutting the face boards, give yourself a little bit of wiggle room. Cut them long enough so they’ll stay tucked into the desired track, but not so long that they’ll be tight and difficult to get in and out.
- I chose to stain the pine front boards (outward facing side only) to help the light wood blend in better with the overall design.
- Add face boards as needed as the compost piles grow taller


Step 8: Optional Finishing Touches
- To give the walls added stability (for the donkeys), we added an 8” flat corner brace to the top of each wall – or four total.
- We also installed lightweight 4-foot Behlen Country steel tube gates on the front of each bay – and installing the J-bolts straight out of the front of the 4×4.
- We also kept both J-bolts facing UP intentionally, so we could easily lift and take the gates completely off and on when needed.
- For added vermin and pest protection (if needed), you could also build and attach a hinged lid on top of each bay, such as with wood and hardware cloth.


Deanna Talerico
Deanna Talerico (aka DeannaCat) is a garden educator and writer with over 15 years experience in organic gardening. She is a retired Senior Environmental Health Specialist, and holds a M.A. in Environmental Studies and B.S. in Sustainability and Natural Resources.


12 Comments
Wendy Taylor
I’m surprised that you don’t mention your chickens in your composting activities… I have read a lot online about how helpful chickens can be to the composting process. Why did you design your composting bins in a way that appears not to utilize your chickens to do some of the work?
Aaron (Mr. DeannaCat)
Hi Wendy, we currently only have two hens so they don’t do that great of a job as far as helping with compost aside from supplying us with chicken manure which we put into a compost tumbler. We may eventually add that into the bins if the compost system if we are building a pile with a lot of dried leaves and plant debris. Right now, the donkey’s do a great job of filling up our compost bins so we haven’t had the ability to try and incorporate the chicken manure into it.
Jessica Fuller
This bin is great and has provided me a plan moving forward with making my own compost. In the past I have bought bagged- black kow or mushroom compost, this year I bought bulk. The composition is 2 parts wood waste:1 part bio solids. The term ‘biosolids’ was one I did not investigate BEFORE acquiring the 12 yard delivery. The lab analysis shows negligible metals and no pathogens.( Class B) As far as I know, they did not test for PFAS. My question is what you think about using compost made from biosolids especially on edibles-vegetables and herbs. Can I/ should I further break down this compost via vermicomposting cutting? I am trying to weigh the pros and cons. Thanks.
Aaron (Mr. DeannaCat)
Hi Jessica, oof, that’s a tough one! It’s great the compost has been tested which should alleviate some of your concerns, I guess my question would be, what are you intending on using the compost for? Are you setting up raised beds, were you planning on top dressing existing beds or in ground garden? If you are going to be filling raised beds, you could always add some of the compost towards the bottom of the beds which would give the compost more time to break down and it wouldn’t immediately be in your plant root zones. It may take more time and effort on your part but you could always test the compost by using it to grow a few plants in containers and see how they respond to it. Have you reached out to the company you bought the compost from and inquire more about it as far as people having success with it in their gardens? Using worms to help further break it down is a good idea but it’s one that would likely take a long time to take place, if you have worms in your garden space already, they will help you out in that regard with time.
Kevin Vandegriff
Thank you so much for taking the time to share your plan for building compost bins! Making a set is on my “to do” list for 2024. Wishing the two of you a prosperous and successful 2024!
Aaron (Mr. DeannaCat)
Thank you so much Kevin and Happy New Year to you as well! Good luck on completing your compost bin at some point this year, it’s something we’ve been needing to do for awhile now.
Bruce Crosby
Enjoyed your article! Gonna need a little wiggle room width wise to get a 4′ tractor bucket in to rotate :). My back hurts just thinking about all the stuff you guys do with a wheelbarrow and shovel. New place looks great!
Aaron (Mr. DeannaCat)
Hi Bruce, thank you so much for the kind words and for the idea of using a tractor bucket! We will have to look into that and see what we can come up with going forward with the whole, work smarter, not harder thing, thanks again!
Jen
Everything you both build and do is fantastic. You are an inspiration.
Aaron (Mr. DeannaCat)
Thank you so much!
Sherry
I am from CA originally, but live in Ohio now. I miss it a lot but my kids, grandkids and great grands live here. Your pics make me want to have a compost bin too.
Aaron (Mr. DeannaCat)
Hi Sherry, thank you so much for reading and Happy New Year to you and your family!