
While a machine-sewn buttonhole is fine, there are occasions when a hand-worked ones will look nicer and do a better job. Maybe you want to add a couture touch to your shirt, suit or dress, or perhaps your fabric is much too thick for your machine to sew the buttonhole. Whatever the reason, this tutorial for how to sew a buttonhole by hand will teach you everything you need to get started.
What is a hand-worked buttonhole?
The first thing to understand about a buttonhole that is sewn by hand vs. one that is sewn by machine is the general principal in how they differ.
A machine-sewn buttonhole is created by marking the opening of the buttonhole, sewing a bar tack at the top and at the bottom of the buttonhole, and sewing a series of tight zigzag stitches on either side of the opening. The opening for the buttonhole itself is cut afterward. The threads on a machine-sewn buttonhole stop before the opening, so a little bit of fabric always remains between the stitching and the opening. It usually frays off after the first washing unless it’s sealed with fray check.
With a hand-worked buttonhole, the concept is a little different, as is the order of the steps. Just like with a machine-sewn buttonhole, first you mark where you want the opening to be. Instead of sewing first and cutting second, reverse the order. Cut the opening first, then the threads are sewn over the raw edge of the fabric, wrapping the fabric with the thread. This creates an edge that never frays and is totally finished along the opening.
Horizontal vs. vertical
Your pattern will likely tell you which way to position your buttonhole, but there are just a few things to think about if you decide to hand-work your buttonhole. Typically a horizontal buttonhole has a flat short end on both sides of the buttonhole, but you can opt for either a fan or a keyhole end on the side that is closest to the inside. So for example, if you are working on a suit coat, the side pointing toward the middle of the coat would have the fan or keyhole. That is where your button would rest when the coat is closed.
For a vertical buttonhole, most often the short end on the top and bottom are both flat. But should you decide you want a curved fan or keyhole end on your vertical buttonhole the curve on a vertical buttonhole is usually done on both ends (unlike a horizontal buttonhole where it is only sewn on the most inside end).
General tips
- When sewing a buttonhole with a sewing machine, the engineering of the machine will do its job and make all the stitches even, a consistent width apart, and all with identical tension from stitch to stitch. When working the buttonhole by hand, all of the precision is up to you. Be careful not to pull the threads too tight, to keep your stitch depth consistent, and to maintain even tension.
- Sometimes people like to double up on the threads and sew with two layers at the same time. Using this method when working with buttonholes can make maintaining your thread tension difficult. Therefore it is advised to only use a single layer of thread at a time.
- As with any buttonhole, do a test on scrap fabric with the exact thickness. If the final buttonhole is to be sewn through the outer fabric, a lining fabric, and a layer of interfacing, then do a test run under the same conditions. Practice your stitches and ensure the buttonhole is the correct size for your chosen button on the test sample before sewing your finished version. Remember, you cut the fabric first on a hand-worked buttonhole so you want to be completely confident that you know the exact length of the hole before you begin your final project.
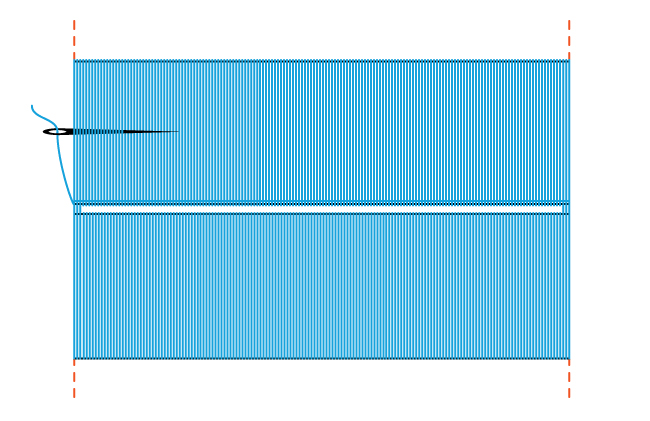
- Want to strengthen the buttonhole? Placing a thin cord (like embroidery floss) under the stitches can make the hole stronger, provide stability, and give the buttonhole a lovely raised appearance.
How to sew a buttonhole by hand
Now that you know some basics, below are the general steps on how to sew a buttonhole by hand. As with any sewing, especially exposed hand sewing, practice makes perfect. Take your time, practice a few buttonholes on scrap fabric, and soon enough you will be a pro! For the sake of clarity, pay attention to the illustrations for each step, as you can see the details much easier this way.
Step 1. mark and cut the buttonhole
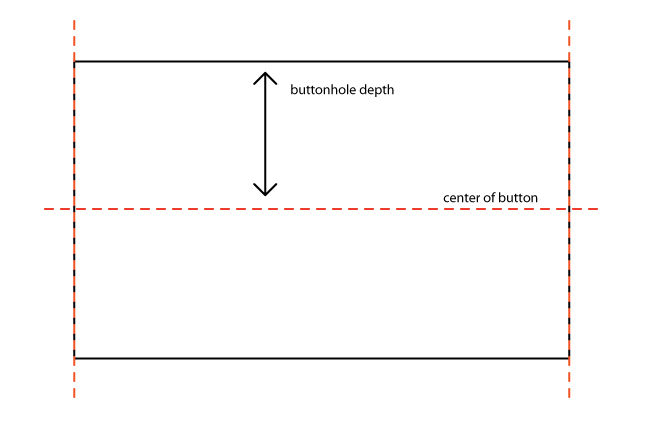
Using the pattern markings as your guide, mark the placement for the buttonhole. For a hand-worked buttonhole, you want to mark the short ends, the center, as well as the long sides so you can sew a consistent stitch for the buttonhole depth. The depth should be approximately 1/16”–1/8”. These marks need to be clean and very visible.
Either use a water soluble marking tool, or sew these by hand with a baste stitch. If you use a baste stitch, be sure to use a contrasting thread color so it is easily removed after you sew the buttonhole.
Once you are absolutely certain on the placement, cut along the center of the buttonhole, from one short end to the other.
Step 2. Sew the first side
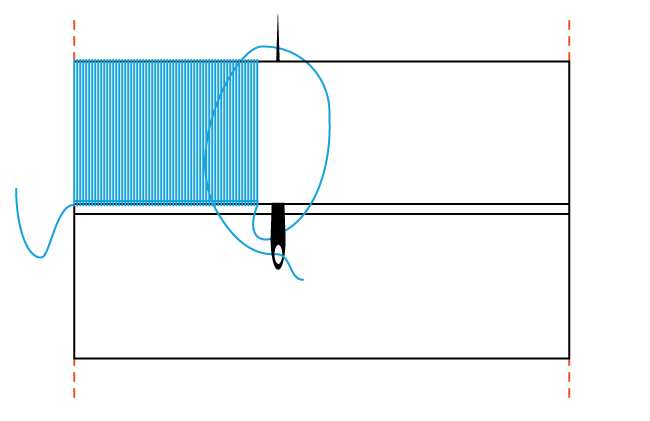
Thread your needle and knot the end. On the right side of the buttonhole, feed the needle through the top corner to secure the thread in place. The buttonhole stitching will cover the small knot. Take the needle from the top corner and place it through the hole from the right side to the underside. Poke the needle through at the top, coming out at the mark along the top edge.
For the next stitch, feed the needle into the hole and poke it out along the top as you did before. However, with this pass, loop the thread under the point of the needle. This way, when you pull through, a purl stitch is created along the open edge.
Repeat this all along the sides of the buttonhole.
Step 3. Sew the second side
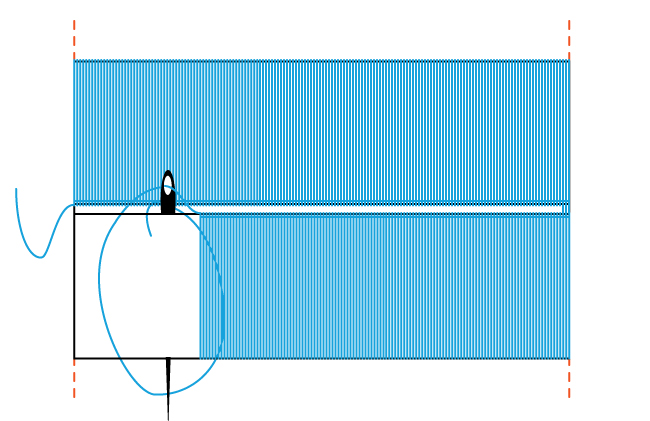
When you get to the end, sew several long stitches to form a bar tack, then continue working your way around, creating a purl stitch until you reach the other side. Form another bar tack on the opposite short end.
Step 4. Finish
Once you have gone all the way around, tightly tuck your needle and thread under your stitching and return your thread to the wrong side to secure.
Optional fan or keyhole ends

If you want to create a keyhole or fan end on either or both short ends of your buttonhole, simply draw or baste an additional line as your guide, then instead of forming a bar tack at the ends, stitch in a curve until you reach the other side, then continue as usual.
What thread do you suggest?. I have heard that you can use embroidery thread but how many strands would you use?
button holes
Excellent explanation. Thank - you