DIY 11 Sonotube Subwoofer
(If you would like to have your DIY project published in Secrets, please E-Mail Ralph Calabria at [email protected].)
About the design and designerby Ralph Calabria
Ron Stimpson is a 16-year veteran
of the US Army, involved in Military Intelligence.His audio interests stem from the many years of reading audio
publications (including Secrets, of course).Like a lot of us, his main impetus to start building subwoofers was the
"I-want-it-all-for-almost-nothing" syndrome. As these pages have preached in the past, if you want big bass and don't want to pay big bucks, make it yourself.When Ron is not building subs, he can be found lifting weights and
bicycling.Ron shares with us one
of the many subwoofers he's built using Sonotubes (a la Hsu Research
Technology).The design is based on
a 12" Hsu car audio driver in a vented alignment.As you will see, there's not much wood to cut, which is one of the many
advantages of this project.Need an
end table that does more than hold a few books?Read on!
Forget "Got
Milk?" Rather, think "Do You Want Bass?"So I ask, "why not DIY??"If
you want to get the most "bang for your buck", go for a do-it-yourself
subwoofer.Why?Perhaps you too have a fairly meager home theater budget, but still want
lots of bass. With a little homework, some "Hsu Research" drivers, and
items from part supplier "Madisound", (filled out with supplies from
Home Depot), I was able to make two very attractive looking subs for very little
money (comparatively speaking).So
can you, and with common tools.
Now, even with a good home-built
sub, you need power; but used amps like my Soundcraftsmen (model PM 860,
300watts/channel into 4 ohms) are available for $150 or less.When I tallied things up, I was still under budget (and based on advice
from Tom Vodhanel, AKA "The Sub Human"), I ended up getting a new ART
351 equalizer to give me more flexibility in tuning the sub in my room.
The Bottom Line: For less than
$600, I've got two subs that extend to below 20 Hz and pump out SPLs in the low
120 dB (nearfield).I think they
look better and sound louder than store-bought subs, even those that cost twice
as much.Not including the power amp, you can build a first rate sub for about
$200 US.
I'm no genius.If you can make a spice rack for your "significant other", you
can make a cloned Hsu powered, cylindrical-based sub. Of course, you can use other drivers too, but it would be hard
to beat Hsu woofers for the price/performance ratio. If you have a weekend, and like to work with your hands,
it's the best way to rock on a budget.
Here's the "Reader's
Digest" version of making the 'The RJS Big 12"er Subwoofer', an
end-table configured cylindrical subwoofer.It's very similar to the Hsu 12Va, which can be found at http://www.hsuresearch.com.The word is that Dr. Hsu is no longer making this model.For me, this was all the more reason to build my own sub!Having completed this sub, I felt confident to design something a bit more
original.Since building this sub,
I've built two others.
For this design, I used a 23"
(height) piece of 24" (diameter) "Sonotube", which is a super-dense
concrete form material (imagine cardboard tubes on steroids), available nearly
everywhere that construction materials are sold.Cutting the tube square
on the ends is tricky, but I found that a good sharp saber saw blade worked fine.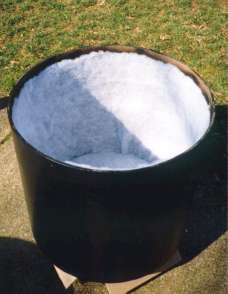 Hsu's 12Va is a bit shorter (20" tube), but I found the larger size
to be perfect for table height (the 3" legs I put on my sub added to the final
tube height).Most such tube
material (there are other brands besides Sonotube) has a heavy waxy-feeling
polymer coating on the interior. I was able to peel this off in full strips, which makes gluing the end caps more certain.After this, I also sprayed the interior with autobody undercoating
(except the ends of the tube) to help reduce resonance.I also affixed a 1" layer of polyester batting material (available
from Madisound) for the same reason.Stick-on
Velcro worked here.Pieces of
tape on the inside of the tube, before you spray with undercoating, make nice
stick-on points for the Velcro.A
rasp/rough file works great to smooth the ends of the tube and round them a bit,
which makes inserting the end caps MUCH easier.
Hsu's 12Va is a bit shorter (20" tube), but I found the larger size
to be perfect for table height (the 3" legs I put on my sub added to the final
tube height).Most such tube
material (there are other brands besides Sonotube) has a heavy waxy-feeling
polymer coating on the interior. I was able to peel this off in full strips, which makes gluing the end caps more certain.After this, I also sprayed the interior with autobody undercoating
(except the ends of the tube) to help reduce resonance.I also affixed a 1" layer of polyester batting material (available
from Madisound) for the same reason.Stick-on
Velcro worked here.Pieces of
tape on the inside of the tube, before you spray with undercoating, make nice
stick-on points for the Velcro.A
rasp/rough file works great to smooth the ends of the tube and round them a bit,
which makes inserting the end caps MUCH easier.
This is the only difficult part of the construction process.Make
these out of 3/4 inch "MDF".This
stuff is much less resonant than particle board, but produces a lot of
dust when being cut.After drawing
the circles that are needed to just fit into the tube (use a stick with a nail and pencil
for a rough but effective compass), I rough-cut the MDF pieces with a saber saw,
then cut close to the pencil line using a band saw. Final precise cutting/smoothing was done with a router and
circle jig.
-
I used a single internal end cap for the top and a double laminated inner end cap for the bottom. The final top was 2" larger in diameter than the tube.This gave a nice top that was, in turn, bonded to the top of the sub (in effect making a 2.25" laminated top).All this might seem over-built.It is NOT.The Hsu sub is famous for moving around. Mine does not, but any less mass and it might be a problem.
-
Laminate the end caps with standard wood glue and clamps.
-
Make sure you cut holes for the driver, ports and binding post/speaker terminals BEFORE laminating. Cutting 3/4" MDF is bad enough!
-
If you use the flares available from Madisound (see below or go to http://www.madisound.com), the cuts will be larger than the inside diameter of the ports, but the flares provide a nice means to fasten the port assembly to the end cap.
-
Endcaps can be affixed to the enclosure with standard wood glue and wood screws (I used flat-head screws, which went in and made their own coutersink).Be sure to put a bead of silicone caulk around the inside seam to seal air leaks.

-
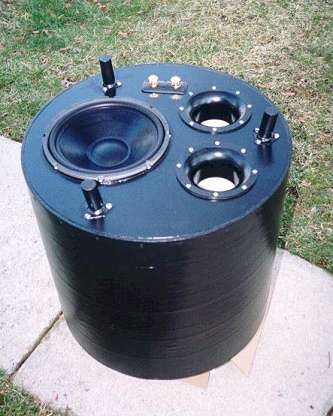
Laying out the ports, binding posts and 12"woofer on the sub bottom (before cutting of course) really is best done, by eye, with the items in place.Maximize space around each of these items and you are all set to cut.
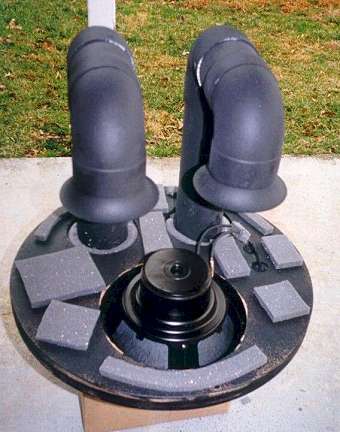
Depending on the enclosure volume
and the desired tuning frequency, you need to finalize port length. 4" thin-wall PVC "sewer pipe" is ideal, as are
the 90" elbows you need to assemble the "J" shaped ports.This configuration is used by Hsu, and in my design to get (in my case)
35" long dual ports to fit into a 23" high tube. Given my enclosure
volume, these ports resulted in a 19 Hz tuning frequency.Subsequent tests have validated this.The port flares from Madisound are slick, but I suspect hardly critical. Standard PVC pipe glue works fine to assemble the ports, but
once glued, they cannot be unstuck (you have about 3 seconds to adjust them once
you place glued ends together).Again, you want to maximize the space around everything in the sub.My ports are no closer than a port width from each other.They rise about 16", go parallel to the top, then bend back down to
"hover" directly over the driver, which is mounted externally,
pointing downward.I sprayed nearly
a whole 20 oz. can of rubberized undercoating on all port tubes and the end caps
to kill vibration, and added more polyester batting to the ends too. This paid
off, as I have not a single buzz or rattle.
I managed to find some furniture
legs with stamped steel base plates.The
total "reach" of the legs was cut to 3". Don't go with much less, since there is A LOT of air being
moved by the driver and ports under load.I
used "T Nuts" from the inside of the sub to reinforce the bolts, which
affixed the legs from the bottom.I
would hesitate to rely solely on simple wood screws to bite sufficiently into
the MDF.It's really pretty fragile
stuff.(I did use wood screws and
silicone to affix the driver to the underside of the sub, however.) I used only
three legs for this design, as did Hsu. This gives good balance on any surface.
Heavy duty rubber "stick-on" bumpers helped stick the legs to my wood
floor.
I went with this design since I
knew it would be out in the open part of my room.Madisound
sells heavy black speaker cloth that is perfect for making a double layer
"sock" to slip over the tube.Make
the sock about 1" too small in circumference and one inch too long in
height. This will make the stretch of the sock perfect.I painted the tube in semi-gloss black first to help make sure it would
be truly black.It is a perfect Hsu
"clone" externally.I
upgraded Hsu with the top.His
is (externally) only one layer and flush with the tube.Mine was 1.5" thick (dual layers of MDF) and 2" diameter larger
than the tube. I put a 1/2" radius on the corners using a router.After a coat of gray primer, I finished the top with granite finish
"speckle paint". This not only looks nice, but makes detailed sanding and
finishing unnecessary.(The top was
bonded to the single layer inner end cap with about 3/4 tube "Liquid
Nails".)
 |
 |
So far, this project exceeded
my hopes, and it seems to work very, very well.That old Soundcraftsmen amp, driven by the LFE channel of my Denon
receiver, really does the trick.I
would not go with less than 150 watts into the 4 Ohm load that the Hsu driver
gives. With 300 watts you can exceed the maximum excursion the driver.Summing up performance, you can expect that such a sub, corner
loaded, will attain about 117 - 118 dB at 20 Hz using a 1 m microphone distance.
With typical room gain then, you'll see (or rather hear and feel!) greater than
110 dB from 20 Hz and up in most listening positions in the typical home theater
room. This is competitive with many VERY expensive commercial subwoofers. Best
of all, this sub seems subtle when needed. It does not intrude unless the LFE
calls for it.
12" Hsu Driver (go to the autosound section of the Hsu website, and the 12" driver listed there is the one you want. A true bargain at $99 plus shipping. http://www.hsuresearch.com).
One 23" High, 24"
diameter "Sonotube" (local concrete supply)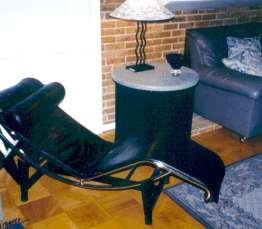
Pair of heavy duty 5-way binding posts
(Madisound, look through the Madisound pdf files
for parts http://www.madisound.com)
One sheet 3/4 inch MDF (cut to provide a two layer inset bottom, single layer inner
top, and double thick bonded larger outer top) (Home Depot).
Two sets 4" inside diameter
port "flares" (Madisound)
Four Thin wall PVC 90 degree elbows
(Home Depot).
One 4" I.D. thin wall PVC pipe
(approximately 45"; Home Depot).
1" panhead wood screws
(approximately 24; Home Depot).
1.5" coarse thread flathead
wood screws (approximately 40; Home Depot).
About 10 oz. "Tightbond"
wood glue (Home Depot).
1/2 Tube black silicone caulk (Home
Depot).
3/4 Tube "Liquid Nails"
cement (Home Depot).
1 Sq. Yd. 1" thick "Accoustic
Foam" (Madisound)
2 Sq. Yd. 1" thick polyester
"speaker batting" (Madisound)
2 Sq. Yd. knit black speaker cloth
(Madisound)
10" 12 gauge speaker wire
(from my "Big-bag-o-wires")
Two 20 oz. cans of automotive
spray "rubberized undercoating"(Pep
Boys)
Here's the pertinent stuff on the
Hsu 12" driver:
Fs = 29Hz
Qms = 8.86
Qes = .318
Qts = .307
Vas = 108 liters
Re = 4.1 Ohms
Sd = 0.0535m2
Xmax = +/-14 mm
Pe = 250W RMS
I found the following items
practically "must haves", though you might find better ways to do
nearly anything below.This is my
growing list of what the Army would call "Tactics, Techniques, and
Procedures".I just call it
"stuff I wish I had known when I started building subs".
"Sonotube": Your local cement supply store probably stocks many sizes of "Sonotube"
though I've yet to actually find that brand.Regardless, if you can get the length of tubing diameter you need, and no
more, great.Most places require
you to buy a 10' or 12' section though. If that's the case (even though it's
priced by the foot), you might find a friend who'll want to do a sub too, or
like me, decide to do a few different kind of subs. Either way, you'll find the
stuff amazingly thin, yet very easy to work with and perfectly suited for
cylindrical subs. If you are going with a straight forward 12" "TN
1220" type sub, you might find shorter sections of 12" Sonotube at a
place like "Home Depot". Personally I wouldn't mess with anything
smaller than 16" diameter Sonotube.Do
the math and you'll be amazed at how much more volume you can get with a
nominally larger tube.
Sabersaw: If you already have one, you are halfway home. If not, figure on getting one. This is a
must have. I found a nice cheap one on sale at Sears that is perfect for this
use. It's an "Autoscroller" (about $60 on sale) that came with an
edge/circle guide that allows for nearly perfect circle cutting - a key task
here.I had to modify the circle
guide by moving the pin an inch or so further out than intended, to allow cutting
of 16" diameter MDF.Of course
you can cut circles (after drawing them out, see below) "freehand", but
frankly that's a huge pain, and makes final size routing far more work (with far
more dust).Get the circle
"rough cut" as accurate as possible with a circle guide, and the rest
of the job goes much easier.About
blades (not the vampire type): Get a set of good quality rough cut blades.
They'll last much longer and heat up less.
Router: Now, if you are the type who just "fills in the gaps with plenty of
glue", take heed.Any air gaps
will weaken the integrity of your sub design. Also, that Sonotube isn't
perfectly round by the time you haul it home.A router, with a circle guide makes perfect end caps a snap.I got a cheap Sears router (normally $80 for $50 on sale) that's more
than adequate for this sort of work.Equally
as important though, even if you already have a router, is one of Sears' (I'm
sure there are others) "Multipurpose Router Guide Kit" (925179) for
about $20.This simple base plate
allows trimming and rounding (of your sub top if you make one) in
PERFECT CIRCLES.The guide will
extend to allow 24" diameter cuts.I
know some of you might just get a straight cut bit and want to skip the rough
cut of the circle/end caps (via a saber saw) and try to do this with the router.I'm sure it COULD be done that way.It wouldn't be a pretty sight though.MDF, as noted previously, makes a huge amount of dust when being cut.MDF is also pretty dense, and cutting a quarter inch swath (a standard
router bit) through this stuff is VERY slow and will kick up copious amounts of
dust.Also, it would take one heck
of a router and carbide bit to do this; plus multiple passes would be needed to
boot (with increasing depth in each pass).Do yourself a favor and cut to about 1/16" or 1/8" accuracy
with a saber saw first, then use a router to get it "just right".A tube should be able to be tapped into your end cap with a mallet, but
still come out with a knock from the same.Two bits get a lot of use in my sub building: 1/4" straight cut and
1/2" radius.The first is for
final trim of end caps, the second for making nice rounded edges for tops or
baseplates.Carbide bits cut faster,
last longer, and are worth the extra money.
Compass: To
lay out end caps on MDF, or drivers and ports in the end caps, you must be able
to draw accurate circles in pencil.I'm
sure there are some good tools available for this, but I had a spare builder's
square (the cheap kind with a little bubble level built in).I hot-glued a piece of copper tubing just larger than a pencil to the
cast iron "L", crimped it a bit (inserting a pencil), and screwed a
fixed nail exactly to the 1" mark as the center point. Voilà!This
made a crude but effective compass that can be set to draw circles to 24".You can even get by with a nail through a piece of trim, and a clamp (for
the pencil).Either way, drawing
accurate circles will be a key skill as you lay out components.
Miscellaneous (in no particular order, just stuff I could not do without):
1. A
rough file and a "rasp".I
use both.They are perfect for
smoothing MDF and taking down edges of the Sonotube.Little things like rounding the leading edge of the tube and the end caps
make assembly SO much easier.A
nice coarse file will do the trick here.
2. Hot
glue gun.I like to partially
assemble my subs, especially with a new design, for some basic testing.Hot glue allows for "tacking together" your sub easily.One bead of glue on the exterior is usually enough to seal any air gaps.It also peals off easily for final assembly.
3. 100%
Silicone caulk.God's gift for
sealing your sub tight.One
1/4" bead around the inside edge of the Sonotube (just before inserting the
end caps, say 1/2" in from the edge of the tube) makes a perfect seal.Also, silicone is nice stuff for providing a little adhesion and damping
on things like dowels and feet, depending on the fittings you use.
4. Wood
glue.Get the kind made
specifically for wood (typically yellow in color).You'll use a fair amount for bonding end caps together, so get a big
bottle (there's nothing like running out in the middle of a sub!)
5. Clamps
and glue tips.Again, cheap wood
clamps from Sears or K-Mart will do fine. The 4" clamps work the best for
laminating MDF end caps (be careful; MDF is fairly easy to dent).I use at least eight around the inner and outer perimeter (since you cut the
port and driver holes before laminating, there are a number of clamp spots to
use).Since the best technique is
to spread a thin film of glue over both surfaces to bond before clamping, be
prepared to wipe off glue as it squeezes out.Don't worry about some dripping and drying though.Once glue is dry you can use your file to take down hard drips on the
edges. You don't need to leave the clamps on long.Most such glue (with relatively porous MDF or plywood) sets up quickly.You can remove the clamps after an hour or so and move on to the next end
cap.
6. Screws
and such. I found out the hard
way that there are screws and there are SCREWS.Cheap "drywall" coarse screws are prone to breaking.Get deck type or square-drive screws that can take much more torque.You won't need many, but a screw every six inches around the middle of
the end caps (try to avoid the lamination glue seam though) makes for a far
stronger/tighter sub. Driving a
pilot hole is advisable.I've
noticed that MDF can split if you use too large a screw without a pilot hole.Use flat head screws and they'll drive flush into the Sonotube.I don't need to tell you that a power drill is critical for this part of
sub building.A power
"screwdriver" ain't gonna get it either bubba.A typical dual cell cordless drill works great.Smaller pan head screws work fine for attaching drivers.
7. Foam
tape.Get a roll of 1/4"
wide heavy-density one-side adhesive weather strip (Madisound sells it, as does
nearly any hardware store).This
stuff is perfect for applying around the edges of driver holes and port flanges
(if you use them).It makes a
perfect airtight seal and damps vibration of any hard parts that might otherwise
vibrate.Avoid gluing or putting
silicone caulk inside or outside edges of the driver flanges.If you use silicone instead of foam forget EVER removing a driver (hey,
accidents happen, and you might need to do it someday) without doing major
surgery on your tube.
8. Rubber undercoating.Sonotubes
are pretty inert.But stick your
head in one and tap the side.You'll
hear a good bit of echo and ringing.Now
I've not done any scientific measurements, but after spraying the inside of my
subs (ports and end caps too), there is far less resonance.Is it critical?Hsu and
other guys much smarter than me don't seem to think so, but for $10 for two cans
of 100% rubber undercoating (avoid the asphalt based stuff), it's worth it to
me.Tapping the inside after my
patented treatment (but you can use it), you'll find far quicker decay of any
resonance.I no longer strip the
inside polymer coating off the Sonotube either (as I did in my first sub).I found silicone (for the end cap seal), and the rubber undercoating,
sticks fine to it, though nearly nothing else does.If you only used wood glue on the end caps, you would regret not taking
off the inside coating in the first few inches of the tube. You've been warned.
So what are you waiting for? Get
subbing!
- Ron Stimpson ([email protected])
Acknowledgements:
Once again, I must say that much of the design assistance on this project came from Tom Vodhanel (from the Home Theater Forum). During my research, I even got some tips from Russ Button and Stacey Spears along the way (thanks guys). Final thanks go to my Dad, who instilled in me the love of "doing things myself" (and let me cover his shop with copious amounts of MDF dust)!
Magazine Publishing Solutions by